Homemade Chocolate-Covered Ice Cream Bars
If you love classic chocolate-covered ice cream bars, you’ll be thrilled to learn how easy it is to make them at home. These Homemade Chocolate-Covered Ice Cream Bars are creamy, customizable, and incredibly fun to prepare.
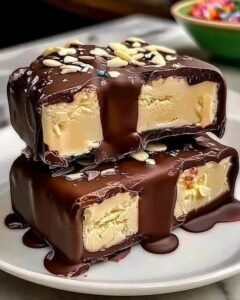
With just a few ingredients—your favorite ice cream, melted chocolate, and toppings—you can create frozen treats that rival anything from the ice cream truck. The smooth chocolate shell hardens instantly around the cold ice cream, creating that satisfying snap with every bite.
Even better, this recipe allows endless creativity. From crushed cookies and nuts to colorful sprinkles, you can personalize each bar exactly the way you like.
Why I Love This Recipe
This dessert is a favorite because it’s both simple and incredibly fun to make.
First, it requires very little preparation. Most of the time involved is simply freezing the ice cream.
Second, it’s a great activity to do with kids or family. Everyone can decorate their own bars with different toppings.
Finally, it’s completely customizable. You can experiment with different ice cream flavors and chocolate coatings to create your own signature frozen dessert.
If you enjoy easy homemade sweets, recipes like Moist 1-Bowl Banana Bread – The Easy Recipe That Never Fails are also great treats to keep in your baking rotation.
Homemade Chocolate-Covered Ice Cream Bars
Creamy ice cream bars dipped in rich melted chocolate and topped with nuts, cookies, or sprinkles for a fun homemade frozen dessert.
Prep: 10 min | Cook: 0 min | Total: min
Servings: 8 servings
Ingredients
- Vanilla ice cream (or any preferred flavor)
- Melting chocolate (milk, dark, or white)
- Crushed nuts
- Crushed cookies
- Sprinkles
- Popsicle sticks
Instructions
- Press softened ice cream into a rectangular dish or silicone mold to create an even layer. Insert popsicle sticks and freeze for at least 4 hours until completely solid.
- Melt the chocolate in a microwave-safe bowl according to package instructions, stirring until smooth.
- Remove the frozen ice cream from the mold and cut into bars if needed.
- Dip each ice cream bar into the melted chocolate, letting the excess drip off.
- Immediately sprinkle crushed nuts, crushed cookies, or sprinkles on top while the chocolate coating is still wet.
- Place the coated bars on a parchment-lined baking sheet and freeze for about 30 minutes until the chocolate shell is fully set.
- Serve frozen and enjoy.
Nutrition
- Calories: 200 calories
- Fat: 11 g
- Carbs: 22 g
- Protein: 3 g
Rate This Recipe
Average Rating: 0 (0 votes)
Ingredients
- Vanilla ice cream (or any preferred flavor)
- Melting chocolate (milk, dark, or white)
- Crushed nuts
- Crushed cookies
- Sprinkles
- Popsicle sticks
Ingredient Swaps and Notes
Ice cream flavors:
Vanilla is classic, but chocolate, strawberry, cookies and cream, or mint chocolate chip work beautifully.
Chocolate options:
Milk chocolate creates a sweeter shell, while dark chocolate adds richer flavor. White chocolate offers a fun visual contrast.
Topping ideas:
Try:
- Crushed Oreos
- Toasted coconut
- Mini chocolate chips
- Crushed pretzels
- Caramel drizzle
Molds:
Silicone molds or a simple baking dish both work well for shaping the bars.
Step-by-Step Instructions
1. Prepare the Ice Cream Base
Allow the ice cream to soften slightly so it becomes easy to spread.
Press the softened ice cream into a rectangular dish or silicone mold, creating an even layer.
Insert popsicle sticks into the ice cream.
Place the dish in the freezer for at least 4 hours until completely solid.
2. Melt the Chocolate
Place the chocolate in a microwave-safe bowl.
Heat in 30-second intervals, stirring between each interval until the chocolate is smooth and fully melted.
3. Cut the Ice Cream Bars
Remove the frozen ice cream slab from the mold.
If necessary, cut it into evenly sized bars.
Work quickly so the ice cream stays firm.
4. Dip in Chocolate
Holding each bar by the popsicle stick, dip it into the melted chocolate.
Allow the excess chocolate to drip off.
5. Add Toppings
While the chocolate coating is still wet, sprinkle your desired toppings over the bar.
This allows the toppings to stick to the chocolate shell.
6. Freeze Again
Place the coated bars on a parchment-lined baking sheet.
Freeze for about 30 minutes until the chocolate shell is completely set.
7. Serve
Once the chocolate has hardened, your ice cream bars are ready to enjoy.
Serve immediately or store in the freezer.
Tips for Success
Work quickly:
Ice cream melts fast, so prepare toppings ahead of time.
Use parchment paper:
This prevents the bars from sticking during the final freeze.
Keep chocolate warm:
If the chocolate begins to thicken, gently reheat it for easier dipping.
Freeze thoroughly:
Fully frozen ice cream ensures the chocolate shell sets quickly.
Serving Suggestions and Pairings
These chocolate-covered ice cream bars are perfect as a standalone dessert, but they also pair wonderfully with other sweet treats.
For example, you can serve them alongside comforting baked goods like Moist 1-Bowl Banana Bread – The Easy Recipe That Never Fails.
For brunch gatherings, breakfast favorites like Classic French Toast – The Golden Breakfast Everyone Loves or Fluffy Buttermilk Pancakes – The Secret to a Perfect Breakfast Stack make a delicious combination.
If you’re planning a full weekend brunch menu, recipes like The Ultimate Overnight Oats Guide – 1 Base Recipe, 6 Easy Flavors add a healthy option to the table.
And if you want a savory dish to balance out the sweetness, something refreshing like Easy Classic Pasta Salad for Any Gathering works well.
Nutritional Information (Per Serving)
Approximate values:
- Calories: 200
- Fat: 11 g
- Carbohydrates: 22 g
- Protein: 3 g
Nutrition may vary depending on the ice cream flavor and toppings used.
Storage and Leftover Tips
Freezer storage:
Store the finished bars in an airtight container in the freezer for up to 2 weeks.
Layer with parchment paper:
Place parchment between layers to prevent sticking.
Prepare ahead:
These bars are perfect for making ahead of time for parties or gatherings.
Avoid repeated thawing:
Keep them frozen until ready to serve to maintain texture.
Final Thoughts
These Homemade Chocolate-Covered Ice Cream Bars are proof that making your favorite frozen treats at home can be simple and fun. With creamy ice cream, a crisp chocolate shell, and endless topping possibilities, they’re guaranteed to be a hit with both kids and adults.
Whether you’re making them for a summer party, a family dessert night, or just a sweet craving, these DIY ice cream bars are always a delicious choice.
If you try this recipe, I’d love to hear how it turned out! Share your favorite topping combinations, leave a comment, and follow along for more delicious recipes and kitchen inspiration from Jason Griffith at Chef Maniac.


Leave a Reply