
The Best Homemade Pineapple Upside-Down Cake Recipe

Pineapple Upside-Down Cake
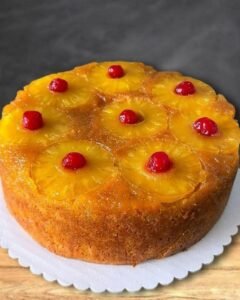
Few desserts feel as nostalgic and charming as a Pineapple Upside-Down Cake. That glossy layer of caramelized brown sugar, golden pineapple rings, and bright cherries sitting atop a soft vanilla cake is pure old-school comfort.
When you flip the cake and reveal that beautiful caramelized topping, it never fails to impress. The best part? It’s surprisingly simple to make and requires everyday pantry ingredients.
This is one of those timeless desserts that works just as well for holidays as it does for a casual Sunday dinner.
Why I Love This Recipe
As a longtime fan of classic American desserts, I appreciate recipes that stand the test of time. This cake delivers:
- A buttery, moist crumb
- Sweet caramelized brown sugar topping
- Bright pineapple flavor
- A show-stopping presentation with minimal effort
It has that same dependable charm as Moist 1-Bowl Banana Bread – The Easy Recipe That Never Fails — simple, reliable, and always a crowd-pleaser.
Plus, flipping the cake is just plain fun.
Pineapple Upside-Down Cake
Classic pineapple upside-down cake with caramelized brown sugar topping and soft vanilla cake.
Prep: 20 min | Cook: 45 min | Total: min
Servings: 10 servings
Ingredients
- 2 cups (250 g) all-purpose flour
- 1 1/2 teaspoons baking powder
- 1/2 teaspoon baking soda
- 1/2 teaspoon salt
- 1/2 cup (115 g) unsalted butter, softened
- 1 cup (200 g) granulated sugar
- 2 large eggs
- 1 teaspoon vanilla extract
- 1/2 cup (120 ml) milk
- 1/2 cup (120 g) sour cream or yogurt
- 1/2 cup (100 g) brown sugar
- 1/4 cup (60 g) unsalted butter, melted
- 6-8 pineapple slices (fresh or canned)
- Maraschino cherries (optional)
Instructions
- Preheat oven to 350°F (175°C). Grease an 8- or 9-inch round cake pan.
- Pour melted butter into the bottom of the pan and sprinkle evenly with brown sugar. Arrange pineapple slices over the sugar layer and place cherries in the center of each slice if using.
- In a bowl, whisk together flour, baking powder, baking soda, and salt.
- In another bowl, cream softened butter and granulated sugar until light and fluffy. Beat in eggs one at a time, then add vanilla and sour cream.
- Add dry ingredients alternately with milk, mixing until just combined.
- Carefully spread batter over the pineapple layer and smooth the top.
- Bake for 40-45 minutes until a toothpick inserted in the center comes out clean.
- Let cake rest in the pan for 10 minutes, then invert onto a serving plate while still warm.
Nutrition
- Calories: 390 calories
- Fat: 16 g
- Carbs: 58 g
- Protein: 5 g
Rate This Recipe
Average Rating: 0 (0 votes)
Ingredients
Here’s everything you’ll need for 10 servings:
Cake Batter
- 2 cups (250 g) all-purpose flour
- 1 ½ teaspoons baking powder
- ½ teaspoon baking soda
- ½ teaspoon salt
- ½ cup (115 g) unsalted butter, softened
- 1 cup (200 g) granulated sugar
- 2 large eggs
- 1 teaspoon vanilla extract
- ½ cup (120 ml) milk
- ½ cup (120 g) sour cream or yogurt
Topping
- ½ cup (100 g) brown sugar
- ¼ cup (60 g) unsalted butter, melted
- 6–8 pineapple slices (fresh or canned)
- Maraschino cherries (optional)
Ingredient Notes & Swaps
- Pineapple: Canned pineapple rings work perfectly — just drain them well.
- Sour Cream or Yogurt: Adds moisture and slight tang for a tender crumb.
- Cherries: Optional, but they give that classic vintage look.
- Brown Sugar: Creates the caramelized topping that makes this cake iconic.
Step-by-Step Instructions
1. Prepare the Pan
Preheat oven to 350°F (175°C). Grease an 8- or 9-inch round cake pan.
2. Make the Caramel Layer
Pour melted butter into the bottom of the pan. Sprinkle brown sugar evenly over it.
Arrange pineapple slices on top of the sugar layer. Place a cherry in the center of each slice if using.
3. Mix Dry Ingredients
In a bowl, whisk together flour, baking powder, baking soda, and salt.
4. Cream Butter & Sugar
In another bowl, beat softened butter and granulated sugar until light and fluffy. Add eggs one at a time, then mix in vanilla and sour cream.
5. Combine
Add dry ingredients alternately with milk, mixing until just combined. Do not overmix.
6. Assemble
Carefully spread the batter over the pineapple layer and smooth the top.
7. Bake
Bake for 40–45 minutes, or until a toothpick inserted in the center comes out clean.
8. Flip
Let the cake rest for 10 minutes. Run a knife around the edges, then invert onto a serving plate while still warm.
The reveal is the best part!
Tips for Success
- Don’t skip resting time before flipping — it helps the topping set.
- Grease the pan well to prevent sticking.
- Avoid overmixing the batter for a tender texture.
- If worried about sticking, line the bottom with parchment paper.
Serving Suggestions & Pairings
This cake is wonderful served slightly warm with:
- A scoop of vanilla ice cream
- Fresh whipped cream
- A drizzle of caramel sauce
For a full brunch spread, pair it with classics like:
- Classic French Toast – The Golden Breakfast Everyone Loves
- Fluffy Buttermilk Pancakes – The Secret to a Perfect Breakfast Stack
Or balance the sweetness with a savory favorite like How to Make Perfect Grilled Cheese with Homemade Tomato Soup for a comforting lunch-and-dessert combo.
Nutritional Information (Per Serving)
- Calories: 390
- Fat: 16g
- Carbohydrates: 58g
- Protein: 5g
A sweet treat that’s perfect for celebrations or whenever you’re craving something nostalgic.
Storage & Leftover Tips
- Room Temperature: Store covered for up to 2 days.
- Refrigerator: Keeps well for 4–5 days.
- Freezer: Wrap tightly and freeze for up to 2 months.
- Reheat gently in the microwave for that just-baked warmth.
More Recipes You’ll Love
If you enjoy classic baked goods and comforting favorites, try:
- Moist 1-Bowl Banana Bread – The Easy Recipe That Never Fails
- Classic French Toast – The Golden Breakfast Everyone Loves
- Fluffy Buttermilk Pancakes – The Secret to a Perfect Breakfast Stack
- The Ultimate Overnight Oats Guide – 1 Base Recipe, 6 Easy Flavors
These recipes make mornings and dessert time equally delicious.
Final Thoughts
This Pineapple Upside-Down Cake proves that classic recipes never go out of style. It’s buttery, moist, beautifully caramelized, and guaranteed to impress when you flip it onto the plate.
If you try this recipe, I’d love to hear how it turned out! Leave a comment with your favorite twist, share it with friends, and follow along for more timeless comfort food recipes.
– Jason Griffith