
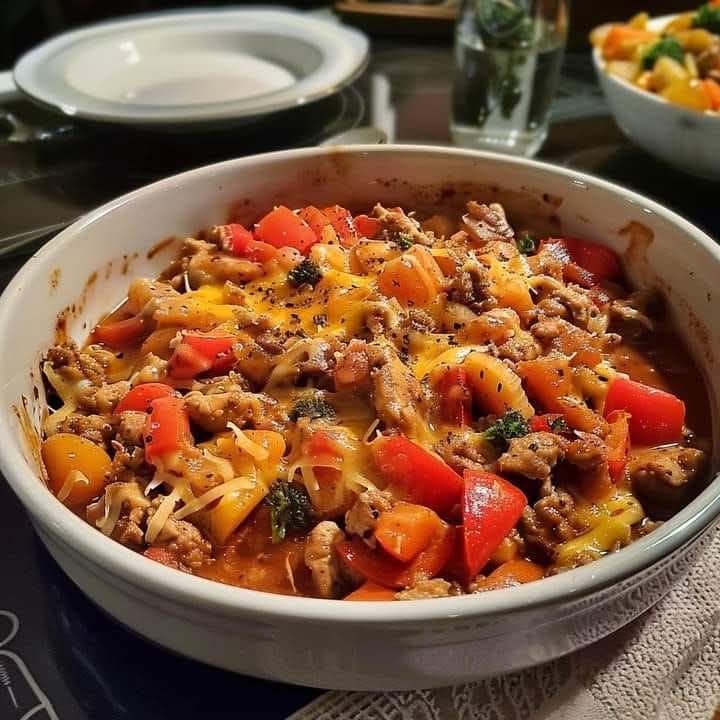
Loaded Taco Bell Style Dorito Beef Crunch Tray

This loaded Taco Bell style Dorito beef crunch tray layers nacho cheese Doritos, seasoned beef, warm cheese sauce, lettuce, tomatoes, sour cream, jalapenos, and shredded cheese into a family-friendly tray bake.
Printable Recipe Card
Loaded Taco Bell Style Dorito Beef Crunch Tray
This loaded Taco Bell style Dorito beef crunch tray layers nacho cheese Doritos, seasoned beef, warm cheese sauce, lettuce, tomatoes, sour cream, jalapenos, and shredded cheese into a family-friendly tray bake.
10 minutes
20 minutes
30 minutes
6 servings
Dinner
American Tex-Mex
6 servings
Not listed
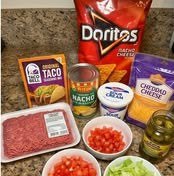
Ingredients
- 1 pound ground beef
- 1 packet taco seasoning
- 2 cups nacho cheese sauce
- 1 bag nacho cheese Doritos
- 1 cup shredded lettuce
- 1 cup diced tomatoes
- 1/2 cup sour cream
- 1/2 cup sliced jalapenos, optional
- 1 cup shredded cheddar or Mexican blend cheese
Instructions
- Preheat the oven to 350 degrees Fahrenheit.
- In a skillet over medium heat, cook the ground beef until browned, breaking it apart as it cooks. Drain excess grease.
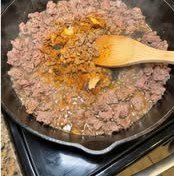
- Stir in the taco seasoning and follow the packet directions, usually adding water and simmering until the beef is saucy.
- Spread the Doritos evenly in a large baking dish or oven-safe tray.
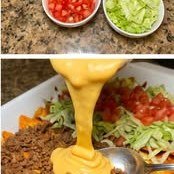
- Pour the nacho cheese sauce over the Doritos, then top with the seasoned beef.
- Add the shredded cheese and bake for 10 to 15 minutes, until the cheese is melted and bubbly.
- Top with shredded lettuce, diced tomatoes, jalapenos if using, and a drizzle of sour cream before serving.


Notes
This recipe is inspired by fast-food taco flavors but is homemade and not affiliated with Taco Bell. Add lettuce and sour cream after baking if you prefer fresher toppings.
Storage
Store leftovers in an airtight container for up to 3 days. The chips soften after storage, so reheat in the oven or air fryer when possible and add fresh toppings after reheating.
Variations
Swap the beef for shredded chicken, black beans, pinto beans, or a meatless crumble. Use spicy nacho chips, add black olives, or finish with salsa, hot sauce, or guacamole.
Nutrition
This loaded Taco Bell style Dorito beef crunch tray is a big, cheesy, crunchy dinner built for the nights when regular tacos do not feel quite fun enough. It takes the flavors people love from fast-food taco night, brings them home, and turns them into one shareable tray with seasoned beef, nacho cheese sauce, Doritos, shredded lettuce, diced tomatoes, sour cream, jalapenos, and melted cheese.
The idea is simple: use nacho cheese Doritos as the crunchy base, spoon warm nacho cheese sauce over the chips, add taco-seasoned ground beef, and bake just long enough for the cheese to melt and the tray to come together. Then the fresh toppings go on at the end so every bite has a mix of hot, cool, creamy, crunchy, and spicy.
This is not meant to be fancy food. It is party food, game-day food, family movie-night food, and easy weeknight taco food all in one pan. It is homemade and inspired by familiar fast-food taco flavors, but it is not affiliated with Taco Bell. The appeal is that you can control the toppings, make it as spicy or mild as you like, and serve it straight from the baking dish.
Why This Crunch Tray Works
The secret is the contrast. Doritos bring salt, crunch, and nacho cheese flavor before you even add anything else. The seasoned beef gives the tray substance, while the nacho cheese sauce helps the beef and chips feel connected instead of dry. Shredded cheese melts over the top, and the cold toppings keep the dish from feeling too heavy.
It also works because it is fast. Ground beef cooks quickly, taco seasoning does most of the flavor work, and the assembled tray only needs 10 to 15 minutes in the oven. That makes it realistic for a 30-minute dinner, especially if you prep the toppings while the beef simmers.
This kind of recipe is easy to scale. Use a smaller baking dish for a weeknight dinner, or spread everything on a large sheet pan for a party tray. You can put toppings in bowls and let everyone finish their own portion, or you can load the whole tray before it hits the table.
Helpful Notes Before You Start
Use a sturdy baking dish or oven-safe tray with enough surface area to spread the chips out. If the Doritos are piled too thick, the bottom chips soften faster. A wider tray gives you more crunchy edges and makes it easier to scoop servings without turning everything into one dense layer.
Drain the ground beef after browning. Extra grease can make the chips soggy and heavy. Once the beef is drained, stir in the taco seasoning according to the packet directions. Most packets call for water and a short simmer, which helps the seasoning cling to the meat.
Nacho cheese sauce can be jarred, canned, or homemade. Warm it slightly before pouring if it is very thick. That makes it easier to drizzle across the Doritos without crushing them. If you like a saucier tray, use the full two cups. If you want the chips to stay crunchier, use a little less and serve extra sauce on the side.
Best Tips for Texture
The biggest challenge with any loaded chip tray is keeping some crunch. The answer is timing. Assemble and bake the tray shortly before serving. Do not let the chips sit under hot cheese and beef for too long before they go into the oven.
Add lettuce, tomatoes, sour cream, and most fresh toppings after baking. Warm lettuce wilts quickly, and tomatoes release moisture. Keeping them fresh gives the tray better color and texture. If you want the fully loaded baked-nacho effect, add a small amount of toppings before baking and finish with fresh toppings afterward.
Serve the tray right away. This dish is at its best when the cheese is melted, the beef is hot, and the chips still have some snap. If you are serving it for a party, consider baking two smaller trays instead of one giant tray. That way the second one can stay crisp until people are ready for it.
Flavor Variations
For a spicier version, use spicy nacho chips, pepper jack cheese, hot taco seasoning, or extra jalapenos. You can also drizzle hot sauce over the finished tray. For a milder family version, skip the jalapenos and use a mild nacho cheese sauce.
Ground beef is classic, but it is not the only option. Shredded chicken works well, especially if you toss it with taco seasoning and a little broth. Black beans or pinto beans can replace the beef for a vegetarian-style tray. A meatless crumble also works if you want the texture of taco meat without using beef.
You can add more toppings too. Black olives, green onions, salsa, guacamole, pickled onions, crushed tortilla chips, or cilantro can all fit. If you want a heartier dinner, serve the tray with Spanish rice, refried beans, or a simple salad on the side.
Serving Ideas
This tray is casual, so serve it casually. Put it in the center of the table with a large spoon or spatula and let everyone scoop a portion. For cleaner servings, use a square baking dish and cut through the layers with a spatula. The chips will still break, but you can get more even portions.
For game day, set up a toppings bar. Keep the baked beef, chips, and cheese warm, then let people add lettuce, tomatoes, sour cream, jalapenos, salsa, and hot sauce. This keeps the tray from getting soggy too quickly and lets everyone control the heat level.
For dinner, pair it with something fresh. A simple chopped salad, cucumber salad, corn salad, or lime slaw balances the richness. You can also serve fruit on the side for a family meal that feels a little lighter.
Make-Ahead Strategy
You can prepare parts of this recipe ahead without losing the crunch. Cook the taco beef up to two days ahead, cool it, and store it in the refrigerator. Chop the lettuce and tomatoes the same day you plan to serve the tray. Keep the chips sealed until the last minute so they stay crisp.
When it is time to eat, warm the beef, assemble the chips and cheese sauce, add the beef, sprinkle on shredded cheese, and bake. The final assembly is quick, and the tray tastes much better than one that sat fully assembled for hours.
Storage and Reheating
This recipe is best fresh, but leftovers can still be useful. Store leftovers in an airtight container in the refrigerator for up to three days. The Doritos will soften, so expect the texture to be more like a taco casserole after storage.
For reheating, the oven or air fryer gives better texture than the microwave. Reheat at 350 degrees Fahrenheit until warmed through, then add fresh lettuce, tomatoes, and sour cream after reheating. If you know you will have leftovers, store some fresh toppings separately so the reheated portion tastes brighter.
You can also repurpose leftovers. Spoon the beef and cheesy chip mixture into tortillas, serve it over rice, or use it as a topping for baked potatoes. The texture changes, but the flavor still works.
Food Safety Note
Ground beef should be cooked to a safe internal temperature of 160 degrees Fahrenheit. For official guidance on handling and cooking ground beef safely, see the USDA ground beef food safety guide. Drain grease carefully, keep hot food hot, and refrigerate leftovers promptly.
Final Thoughts
This loaded Taco Bell style Dorito beef crunch tray is fun, filling, and easy to customize. It is the kind of recipe that makes dinner feel like an event without requiring complicated cooking. Keep the toppings fresh, serve it right away, and let everyone dig into the cheesy, crunchy layers while they are at their best.
Variations
Swap the beef for shredded chicken, black beans, pinto beans, or a meatless crumble. Use spicy nacho chips, add black olives, or finish with salsa, hot sauce, or guacamole.
Storage and Reheating
Store leftovers in an airtight container for up to 3 days. The chips soften after storage, so reheat in the oven or air fryer when possible and add fresh toppings after reheating.
Food Safety Source
For safe cooking temperatures and food handling basics, see the USDA safe minimum internal temperature chart.
Frequently Asked Questions
Can I make this ahead of time?
You can cook the beef ahead, but assemble the tray right before baking so the Doritos keep more crunch.
Can I use chicken or beans instead of beef?
Yes. Shredded chicken, black beans, pinto beans, or a meatless crumble all work well.
Should lettuce go on before or after baking?
For the freshest texture, add lettuce after baking. If you like softer loaded-nacho style toppings, you can add some before baking and finish with more fresh lettuce.
More Recipes You'll Love
Baked Spanish Rice and Beef Casserole with Rotel and Cheddar
Hearty casserole made with Spanish rice, seasoned ground beef, peppers, Rotel tomatoes, and melted cheddar cheese baked
View Recipe
Easy Cheddar Beef Roll Ups – A Fast, Flavor-Packed Dinner Idea
Easy cheesy beef tortilla roll ups made with seasoned ground beef and melted cheddar, perfect for a quick lunch, snack,
View Recipe
Family-Friendly Meatball Pasta Bake – Quick, Cheesy, and Delicious
Easy dump-and-bake casserole with meatballs, bowtie pasta, marinara sauce, and melted mozzarella for a simple, comfortin
View Recipe
Homemade Beef Kofta Wraps – Quick 25-Minute Mediterranean Lunch
Flavorful beef kofta wrapped in warm pita with fresh vegetables and creamy garlic yogurt sauce.
View Recipe